
Part One Online Here.
As I wrote in Part One of this article, after decades of recording my own music, I had developed a system of recording that works for me, and when we departed California for Texas, wanted to build a dedicated project studio to facilitate that.
I wanted to be able to record vocals, acoustic and electric guitar, and hand percussion, and mix down my completed work in an acoustically-treated environment. I also didn’t want my wife to hear me practicing and recording the same part over and over again. And I didn’t want to record full drum kits, the most difficult instrument to record outside of a studio.
So when we bought our house an hour away from Dallas on 16 acres in 2014, I knew that the studio I wanted had become possible. The property originally included a 30-foot square steel shed, but it was uninsulated, and had a dirt floor. So we decided to tear down the shed, and in its place, build a separate structure that would contain a two-car garage, a guest room and bathroom for visiting friends, and dedicated, acoustically-treated studio and isolation booth for me.
We are assisted by: Ed Churchman who designed the building that housed the studio; Wes Lachot, studio designer; Joe Taylor, our general contractor; studio consultant Gavin Haverstick, and Bryan Pape, acoustical engineer of Atlanta’s GIK Acoustics, in supporting roles.
I knew I didn’t plan to record full drum kits, and that helped to define my room’s parameters and the acoustics it needed. Finally we live in the country. And while it’s not noiseless, I didn’t have to worry much about bothering neighbors, and having to sit out an occasional thunderstorm because of external noise was not a problem, which also helped Wes design an appropriate studio for me.
The 320 square foot control room designed to be used extensively for both recording and mixing. The dimensions and angles (none of the 90 degrees) were built around a pair of soffit-mounted Neumann KH420 monitors that Wes recommended. The isolation booth is much less complicated, with walls at right angles and numerous pre-fab acoustic treatments attached to them.
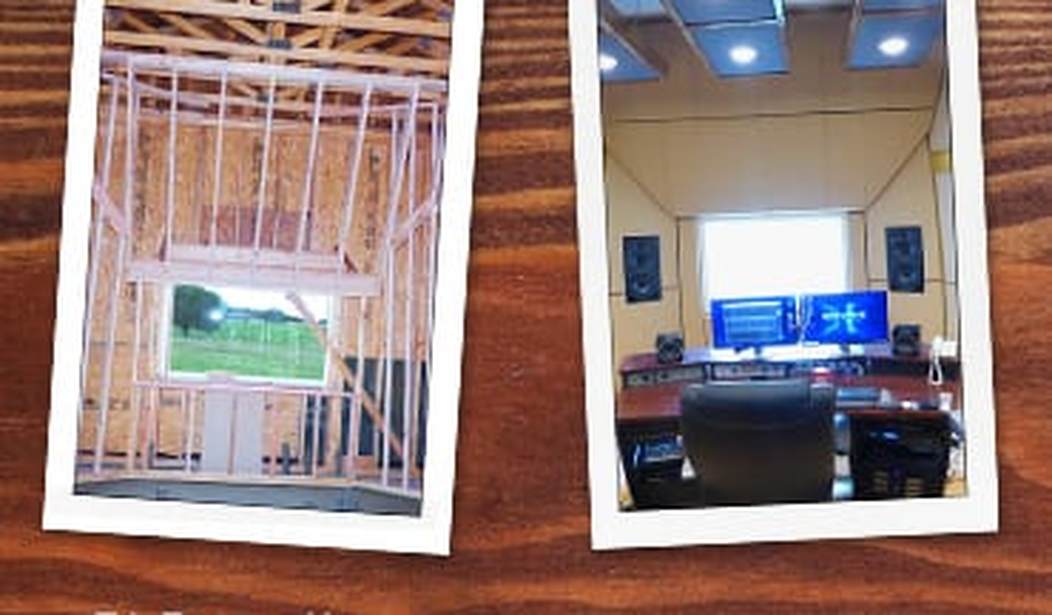
The room is essentially a room within a room, as these photos of its initial framing from a year ago illustrate:


Text on header above control room door (now sadly hidden under drywall, alas. Click to enlarge.)

Pipes sticking up from concrete carry power to under the studio desk, and the audio and data tielines to the iso booth. They were eventually sawed away once the wood floor was installed.
The angled walls of the control room effectively make it a room within a room, and, I’ve been amazed to return to the outside world only to find it’s particularly windy or rainy outside my insulated world. To treat the acoustics within the control room, what I ended up with was a combination of pre-fab diffusers and bass traps purchased from GIK, some pre-fab acoustic panels from Illinois-based ATS Acoustics, and numerous panels custom-made to fit the space built onsite by Joe Taylor’s guys, based on a design created by Joe. They are made mostly out of two-inch and four-inch thick Owens-Corning 703 rigid fiberglass panels in wooden frames.

Hardwood floor installed; drywall before acoustic panels applied.
The panels are wrapped in tan and gray burlap purchased from ATS Acoustics. I chose that muted color scheme, because I wanted something neutral that would be comfortable to work in for the long hours that recording normally takes and wouldn’t cause eye-strain. (I’m not sure why red is such a frequent recording studio color.) The lower walls are tan, the upper walls of the studio are dark grey, to visually keep the eye focused down into the main room area. The custom-built panels were hung with metal cleats, and can be removed, which is particularly useful to access the cavity in the front of the control room, where the wires run to the main monitor speakers and audio and data tielines to the isolation booth.

Site-built acoustic panels removable for wiring access.
A Quick and Dirty Introduction to Sound Control
Sound control and room acoustics are science that some have devoted a lifetime to studying. There are many books and articles on the topic (and we’ll recommend a couple in a moment), but to greatly simplify things, recording studio acoustics generally boil down to three issues. These are: sound control, mid-to-high frequency control, and bass control. Sound control includes both keeping your loud sounds from annoying your immediate family and neighbors, and loud sounds from the outside world bleeding into your recordings.
While having neighbors call the cops because your band is thrashing away or your Marshall stack is peeling the paint off the walls is perhaps the ultimate fear of a home recordist, don’t underestimate how knowing the neighbors or even immediately family members are hearing you play the same guitar licks or singing the same parts over and over can psychologically impede a performance. As the author of the epic “Why Do Your Recordings Sound Like Ass?” thread the Reaper DAW forum sardonically writes, “I think this is one of the dirty secrets of a lot of home recordists: anytime you can hear your neighbors, they can hear you. And unless you are profoundly confident and un-self-conscious, that awareness is likely to affect your performance, which is vastly more important than your audio quality. Your ability to get 40 takes of singing ‘let me lick you up and down’ should not be affected by fear of the elderly landlord couple downstairs.”
(If you’re new to the idea of home music recording — or even if you’re not — I urge you to read that thread from the very beginning — which not coincidentally kicks off with a discussion on treating room acoustics, or download a version of that thread with a much better signal to noise ratio in PDF format.)
Sound control was less of an issue for me because of the studio’s rural location. In an urban or suburban environment, eliminating traffic noise is often an important element of sound control, not to mention preventing neighbors from hearing roaring guitar amps and drums. However, in our setting, rain, wind and thunder are the most consistent noises out here in the country, with occasional bellows from cattle and the nightly coyote yelp-fest. With the “room inside a room” construction, I don’t hear rain, wind, cows or coyotes. On nights when there’s a lot of thunder, I either don’t do live recording in the isolation booth or I just stay home and watch a movie. It’s not like we’re losing studio rental fees the studio is not used. And my wife (in the only house nearby) says she can’t hear a thing coming out of the studio.
That’s not a coincidence, as perhaps the first issue of sound control for me was deliberately building the studio away from the main house, to minimize Nina having to hear the same guitar licks and vocal passages over and over while I’m comping a track. In his excellent 2013 video on the construction of his basement home studio, Mitch Gallagher, editorial director of Indiana-based music retailer Sweetwater discusses the myriad techniques he employed to control the sounds emanating from his studio to avoid annoying his family upstairs, and if you’re at all thinking of building any size project studio (or converting a garage or spare room), I urge you to watch that video, which is an excellent layman’s introduction to acoustics, bass trapping, and sound control. Mitch’s video has over 400,000 views on YouTube — and at least 300,000 of those were from me, as I was planning to build my studio and for reality checks while it was under construction. It’s an excellent primer, as is Gallagher’s 2006 book, Acoustic Design for the Home Studio.
Bass Trapping 101
Sound control is designed to keep sound out of the room, and vice-versa. Controlling the acoustics of the actual rooms where recording takes place involves two factors: mid to high frequency control, and controlling bass frequencies. Mid to high frequency control involves damping down the sound of the room, particularly standing wave echoes. If you clap your hands within a small square room with sheetrock on the walls and ceiling and a hardwood floor, you’ll hear that sound ping several times back. This is murder for percussion and most other musical instruments, and can result in boxy-sounding vocals. Fortunately, mid to high frequencies are relatively easy to treat with foam or fiberglass panels, as we’ll discuss in a moment.
But then we get to controlling bass frequencies, which is a science in and of itself. In a small room, bass waves are a particular issue to control, because they’re so long and slow-moving. It’s very easy for a particular bass note to resonate within a room, causing some notes to be VERY LOUD, and others to be much lower. (You can even hear this from many car stereos as well when a particular bass note becomes what is known as a “a wolf note” that resonates the whole interior.)
Acoustic music recorded in an untreated room often sounds bad. And even if your music involves nothing but direct-injected instruments, synthesizers and loops, when it comes time to mix it down, it’s easy to create a mix that lies about the amount of bass when played on other speakers. To offset the bass response of an untreated room, a technique called “bass trapping” is employed. This is somewhat of a misnomer –- bass trapping isn’t designed to prevent bass from leaving the room; that’s the role that sound control plays. What bass trapping does is smooth out the level of individual bass notes, by using large amounts of fiberglass insulation to convert bass notes into (miniscule amounts of) heat, which is absorbed by the bass trapping material.
The thicker the material employed, the lower the notes “trapped.” And because the underlying wall itself is a null surface, it’s possible to greatly improve the absorptive quality of this insulation by putting some distance between the wall and the material. That’s why manufacturers of pre-fab acoustic panels such as Auralex and ATS Acoustics also sell “impalers” to separate their panels from the walls by one or two inches. Companies such as GIK also build pre-fab bass traps, which are columns filled with large amounts of fiberglass insulation. You can also search Google and YouTube for instructions on so-called “superchunk” corner bass traps to make your own.
However, Wes Lachot’s plan for my studio goes this system several times better. The upper side walls of the control room, the “soffits,” as Wes calls them, are 48 inches in from the room’s actual rear walls.
These soffits were covered with two-inch thick cloth-covered Owens-Corning 703 fiberglass panels. These panels are attached to thin plywood backs, which have been largely cut out, to allow sound waves to travel through them, making the upper side and rear walls serve as a giant bass trap. (In his video, Mitch Gallagher explains the concept of a semi-hollow “leaky wall” to reduce bass notes, which is in part what’s going on here.)

Installing open-backed acoustic panels to create a “leaky” rear soffit.
Also following Wes’s plan, underneath the ceilings of both the control room and isolation booth acoustic clouds were hung, suspended on chains, made of four-inch thick fiberglass ATS panels in wooden frames that were built on site by our subcontractors.

Bryan Pape of GIK suggested several of the acoustic treatments for each room. The rear of the control room consists of six curved GIK Evolution PolyFusor Diffusor/Absorber panels, and in each corner of the room are a pair of stacked GIK Soffit Bass Traps. Following Bryan’s suggestion, I asked our contractors to build a version of these bass traps that fit behind the openings of the angled front walls of the studio, visible in the photos above.

Yes, that’s a lot of bass trapping. But as the authors of Sound on Sound magazine’s Studio SOS Book: Solutions and Techniques for the Project Recording Studio (another fine introduction to room acoustics, and more) note, “Fortunately, you can’t have too much bass trapping as the overall level of bass put into the room by the loudspeakers isn’t significantly reduced by the process. Bass trapping is all about reducing the reflection of low frequencies that would otherwise augment or cancel the direct sound from the loudspeakers. It doesn’t take bass out of the room — it stops the bass from bouncing around inside the room in unhelpful ways!”
Cloud-Based Recording
As with the walls of a recording space, a hard ceiling is also a major source of echoes. That’s why Wes specified that the ceiling of the control room be treated with three 9-foot by 2.3 foot acoustic “clouds,” which are built out of three each four-inch thick prefab gray burlap faced ATS fiberglass acoustic panels, each encased in a stained knotty pine frame, and hung from chains from the ceiling, with holes drilled into the panels to place LED lights. The four-inch thick panels and the extreme height of their placement in the control room (which Wes specified to be 12 feet tall) also help in absorbing lower frequencies.

The walls of the room are treated with a series of mostly two-inch thick burlap-covered 703 fiberglass panels, custom built by our contractors, and on a side wall of the room, after consultation with Gavin Haverstick, a pair of GIK 2A Alpha Panel Diffusor/Absorbers, so that the room wasn’t completely dead.

The adjacent isolation booth was treated with a series of GIK Alpha Panel Diffusor/Absorber panels, GIK 242 acoustic panels, panels our contractors custom-built out of Owens-Corning 703 fiberglass (including on the doors inside the room) and an acoustic-cloud, built out of a modified ATS 48” x 96” panel hung from chains inside a custom-built knotty pine frame.

Near the end of my stint recording in California, I had finally begun using a Neumann TLM-103 condenser mic for my vocals, with a Reflexion “portable vocal booth” in front of it, and a pair of duvets in the back of the den to kill the poor acoustics of my den. (My wife was less than thrilled when these disappeared from the bedroom for long stretches of time.) Preparing the den to record was a slightly onerous task, involving setting up the Reflexion filter and clamping the duvets to bookcases behind them which were not positioned with acoustics in mind.
Fortunately, in the new control room, I can happily record clean dry-sounding vocals just by putting a mic up on a stand, and then treat the vocal with any digital reverb needed to create the appropriate ambience. To celebrate the new room, I purchased a Peluso 2247 vacuum tube-powered condenser microphone, inspired by the classic Neumann (Telefunken-branded in the US) U-47 microphone. Good enough for the Beatles and Sinatra (and more infamously, Frank Zappa as well), good enough for me. It sounds wonderful — but largely because the room is so transparent.
As David Stewart of Sweetwater.com noted when he interviewed Mitch Gallagher, in his aforementioned home studio construction video, “Look, I’m VP of sales at Sweetwater. I would love to sell everybody these really expensive great microphones. And they are great, and they do sound good. And they’re going to pick up your crappy room really well, and reproduce all that nastiness really well. So boy, I just can’t say enough how important it is to tackle those acoustic issues right away.”
Thanks to the plans from Wes Lachot, consults with Bryan Pape and Gavin Haverstick, and the hard work and creativity of Joe Taylor and his subcontractors, I’m extremely happy with the finished results of my studio. Even if you don’t have the space to build a studio from scratch, much can be done to improve the acoustics of a bedroom studio. My project studio is pretty extreme (and it’s the culmination of decades of preparation), but anyone serious about home music recording should aim to make their own studio space sound as good as it can.

Update (February 17, 2018): Since the publication of this article, the studio’s desk was replaced with an Omnirax Force 32 dedicated recording studio desk. The photos in this article showing the original generic desk have been replaced.


Join the conversation as a VIP Member